SQL Reporting services have some benefits over the current reporting solution:
- Provide best in class reporting capability by integrating SQL Reporting Services, with the leading change and configuration management product: SCCM 2007
- Enable Ad-hoc reporting - Make it easy for both SCCM administrators, and non administrators to find the information they need to make the right decisions for their business
- Support alternative databases as the reporting database, such as a replicated or backup database
- Allow custom report creation via a report authoring wizard.
- Enable report browsing and viewing via the SRS Report Viewer.
- Take advantage of rendering in all supported SRS formats, report caching, and subscriptions.
This article will explain setting up SRS with Configuration Manager based on SQL 2008. I’ve taken most of the steps from this article (many thanks to Michael Wiles). I’ve added some screenshots and applied it to SQL 2008, while the original article discusses SQL 2005. If you need more background info on SRS check out that link.
Install and configure SQL Reporting Services in SQL 2008
Be sure to check Reporting Services as part of your SQL installation
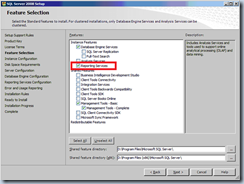
At step 21 of this part of this guide the setup provides you with three choices:
- Native mode default configuration
- SharePoint mode default configuration
- Unconfigured Reporting Services installation
You should select Unconfigured Reporting Services installation at this point.
After the installation finishes you should configure SRS for the use with Configuration Manager 2007.
1. In the start menu select Microsoft SQL Server 2008 / Configuration Tools, then click Reporting Services Configuration Manager.
2. In the Reporting Services Configuration Connection select the Server Name and the Report Server Instance, then select Connect.

3. In the Report Server Status verify that the Service Status is set to Running. If it is not, click Start, and then click Apply.

4. Select Web Service URL and make sure you specify the name you want to call the virtual directory created by Reporting Services (or use the default ReportServer). Optionally you can select the IP-address you want to use, the port and SSL setting. When done click Apply.

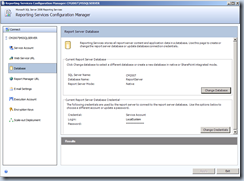
5. Select Database, select Create a new report server database in the Report Server Database Configuration Wizard and click Next

6. Select the Database Server Name and Authentication Type that matches your SQL server and credentials.

7. Supply the Database Name and Language. Be sure to select Native Mode for Report Server Mode. Click Next.

8. Select the proper credentials from the drop list for Authentication Type

9. In the Summary screen review your settings and Click Next.

10. Review your database in the Report Server Database screen.
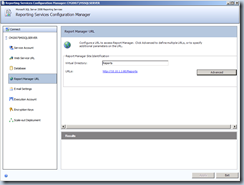
11. Select Report Manager URL and make sure you specify the name you want to call the virtual directory created by Reporting Services (or use the default Reports). Optionally you can select the IP-address you want to use, the port and SSL setting. When done click Apply.
12. Email settings are not mandatory to setup, but can be configured appropiately if necessary.
13. Execution Account is necessary to configure if you will be running unattended reports. Optionally apply credentials and Click Apply.
20. Click Exit to close Reporting Services Configuration Manager.
Configure Configuration Manager 2007
SQL Reporting Services need the configuration of a Reporting Services Point role.
1. In the Configuration Manager console, navigate to System Center Configuration Manager / Site Database / Site Management / <site code>-<site name> / Site Settings / Site Systems.
2. In this guide I will add the reporting services point site role to the existing site system. Right-click the site system name, and click New Roles. On the General page of the New Site Role Wizard, configure the general settings for this site system, then click Next.
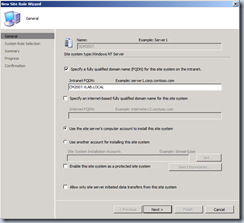
3. On the System Role Selection page of the wizard, select Reporting Services point (don’t select Reporting Point by mistake, which is the traditional reporting functionality), then click Next.
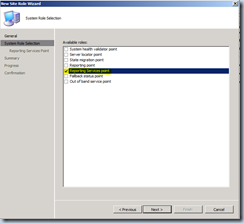
5. On the Reporting Services Point page, specify the folder that will be created on the report server to contain the SQL Reporting Services reports used in Configuration Manager and then click Next.

6. Review the information shown on the Summary page, then click Next.
7. Click Close to exit the wizard.
8. In the Configuration Manager console, navigate to System Center Configuration Manager / Site Database / Computer Management / Reporting / Reporting Services, and expand the node.
9. Right-click the reporting services point server you want to configure, then click Properties.
10. On the Data Source Settings tab of the Report Server Properties dialog box, specify the Configuration Manager 2007 database server and database name (not the one create earlier for reporting!) to be used as the data source for SQL Reporting Services reports. Click the test button to verify that you have correct data entered.

11. On the Data Source Authentication tab of the Report Server Properties dialog box, specify the credentials used to access reports on the report server. I’ve use Windows Integrated Security here.

12. On the Data Source Security tab of the Report Server Properties dialog box, specify permissions for the users who have access to the data source specified in the Data Source Settings tab.
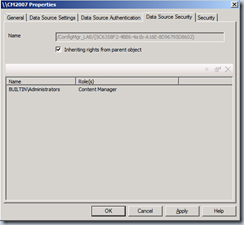
13. On the Security tab of the Report Server Properties dialog box, specify the users who have access to the selected report server.

14. Click OK to close the Report Server Properties dialog box.
Import standard reports in Reporting Services
The last step in configuring SRS for Configuration Manager 2007 is to convert the standard reports to Reporting Services reports.
1. In the Configuration Manager console, navigate to System Center Configuration Manager / Site Database / Computer Management / Reporting / Reporting Services
2. Right-click the Reporting Services server that the standard reports will be copied to, then click Copy Reports to Reporting Services.

3. On the Data Source Settings page of the Copy Reports Wizard, specify the Configuration Manager 2007 database server and database name from which to copy the reports. Click Next.

4. On the Data Source Authentication page of the Copy Reports Wizard, choose the authentication method required to run the copied reports on the reporting point server. Click Next.

5. On the Select Reports page of the Copy Reports Wizard, select the reports you want to copy to the reporting services point. Select Overwrite existing reports if you want to overwrite any reports that already exist on the reporting services point. Click Next.

6. On the Security page of the Copy Reports Wizard, specify which users can access the copied reports and the roles they must belong to. For more information about the options on this page, see Report Server Properties: Security Tab. Click Next

7. On the Summary page of the Copy Reports Wizard, review the reports that will be created, and then click Next.

8. After the reports are copied, click Next.

9. On the Confirmation page of the Copy Reports Wizard, review the information, and then click Close to exit the wizard.
Reports are now available Site Database / Computer Management / Reporting / Reporting Services / <Site Server> / All Reports
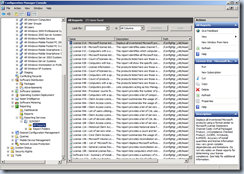
To run a particular report just Right Click the report and select Run.


